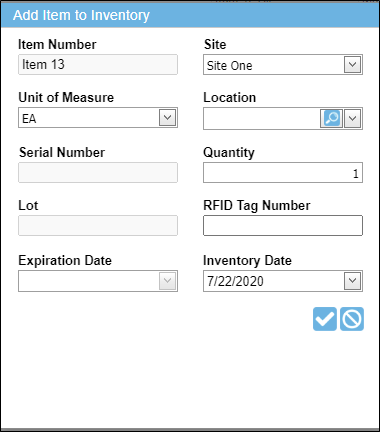
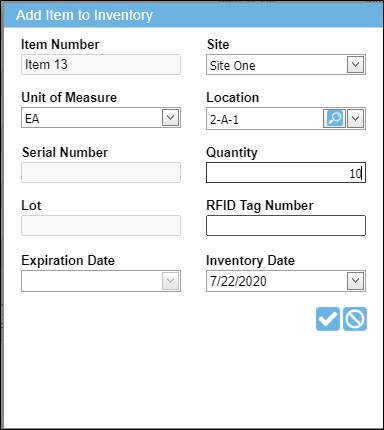
Add Item to Inventory Form
In IntelliTrack, inventory is usually added to a location as part of a physical count (see "Physical Count" for more information); however, inventory may also be added from the Manage Items page.
Feature Requirement
In order to reach the Add Item to Inventory form, and add an item to inventory, the role of the logged-in user must have access to the Add Item to Inventory feature.
Adding Inventory to Containers: If your system uses containers, see "Adding Inventory to a Container" for more information.
Adding Inventory
The steps that follow detail adding an item to inventory.
- Select Manage > Items from the navigation pane.
- The Manage Items page appears. The items found in the default division of the logged-in user are displayed.
- Each item contains an Add icon to the right.

- To add this item to inventory, click the Add icon.
- The Add Item to Inventory form for this item opens.

- This item number is automatically placed in the Item Number field.
- Your default site is automatically entered in the Site field.
- If you have access to another site or sites, and you want to add this item to a location in another site, click the drop-down arrow in the Site field and select the site from the list that appears.
- Set the Unit of Measure:
- If the division uses multiple units of measure, and the item contains the default unit of measure, this unit of measure is automatically selected.
- You are able to select another unit of measure for this item, if the item contains another unit of measure. To view this item's units of measure and select one for it, click the drop-down arrow in the Unit of Measure field and select one from the list that appears.
- If the division uses multiple units of measure, and this item does not contain the default unit of measure, the unit of measure field is blank. You must select a unit of measure from the drop-down list that appears.
- If the division does not use multiple units of measure, the system default unit of measure is automatically placed in the Unit of Measure field.
- If the division uses multiple units of measure, and the item contains the default unit of measure, this unit of measure is automatically selected.
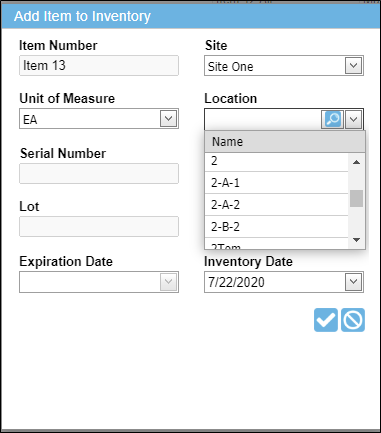
- To add this item to a location, click the drop-down arrow in the Location field and select the location from the list that appears.
- Serial Number field:
- If this item uses serial numbers, the Serial Number field will be activated and you must enter the serial number in the Serial Number field.
- If this item does not use serial numbers, the Serial Number field will not be activated.
- Enter an inventory count for this item in the Quantity field.
- If this is a serialized item, the system will automatically place a quantity of 1 in the Quantity field.
- Lot field:
- If this item uses lots, the Lot field is activated and a lot must be entered for this item in the Lot field.
- If this item does not use lots, the Lot field is not activated.
- Expiration Date field:
- If this item uses expiration dates, an expiration date must be entered for this item in the Expiration Date field. When you place the computer's mouse cursor in this field, a calendar appears; select the date from the calendar to enter the date in the Expiration Date field and close the calendar.
- If this item does not use expiration dates, the Expiration Date field will not be activated.
- RFID Tag Number field:
- If this division uses RFID, an RFID Tag Number field appears in this form.
- This field is activated only if this item uses RFID. When an item uses RFID, the RFID tag number is optional and the quantity defaults to 1.
- If an RFID Tag Number is entered in this field the default quantity of 1 cannot be changed. If an RFID tag number is not entered for the item, the quantity may be changed.

- Today's date is automatically placed in the Inventory Date field. If the inventory is being taken on another day, click the drop-down arrow in this field and a calendar appears. Select the date from this calendar.
- To add this item-location-quantity to inventory, click the Save icon in the bottom right of the form.

- The form closes and you are returned to the Manage Items page; the item has been added to inventory and may be found at the Inventory Data page (see "Inventory Data Page" for more information).
- (To cancel adding this item-location-quantity to inventory, click the Cancel icon found in the bottom right portion of the form.)

- The form closes and you are returned to the Manage Items page; the item has not been added to inventory.